Navigation Point 9. High Traverse off main track
Navigation Point 9 is the decision point at the North West Pinnacle section at the 1st Arrow when approaching from the Ellen Peak end. From here there are two route choices. The first is the high traverse, where you leave the main track, cut left, and take the exposed ledge line across the northern flank of the North West Pinnacle. The second is the lower route, where you stay on the main track and descend through the scrubby rake to Navigation Point 10 at the base of the descent from the 1st Arrow Cave.
For walkers coming from the west, or from the Bluff Knoll end, Navigation Point 9 has a different function. By the time you reach this point, you will already have committed to either the high traverse or the lower route around the North West Pinnacle. In that direction, Navigation Point 9 is not so much the decision point. It is the place where those options have already resolved, and from here you continue south towards the steep climb leading to the 1st Arrow summit.
The map shows these two alternatives clearly. The main route continues downhill towards Navigation Point 10, while the high traverse leaves the main track at Navigation Point 9 and climbs onto the higher line around the North West Pinnacle. Understanding this split on the map before arriving at Navigation Point 9 makes the decision much easier in the field.
A decision needs to be made carefully before anyone commits to either line. It should be based on the experience of the whole party, not just the strongest person. The high traverse requires confidence with height, rock scrambling, steep terrain, narrow ledges, and exposure where a fall in the wrong place could be fatal. If anyone in the group is unsure, uncomfortable with heights, unsteady with a full pack, or not used to moving on steep rock and side slopes, the lower route is the safer choice.
Route finding is also a major part of the decision. The high traverse is not simply a matter of following the most obvious track. Finding the correct line can be tricky, especially when approaching from the Ellen Peak side. If nobody in the party has done this traverse before, treat that as a serious factor. For a first attempt, it is often better to approach the traverse from the eastern end, travelling from Bluff Knoll towards Ellen Peak, because the line is generally easier to navigate from that side.
Weather is another controlling factor. In wet conditions, rain, strong wind, poor visibility, or stormy weather, the high traverse becomes much more serious. If the rock is wet, visibility is low, or the party is already tired, the lower descent route is the safer and more sensible option.
The high traverse is shorter and more direct, but it has serious exposure and requires sound judgement. The lower route avoids the strongest exposure of the high traverse, but it loses more height and eventually funnels into steeper ground. For most parties carrying full packs, the lower route will be the safer and more realistic option.

“Perspective is one of the greatest rewards the mountains offer”
Perspective is one of the greatest rewards the mountains offer
Looking north east from Navigation Point 9
This photograph clearly shows the junction marking the start of the High Traverse. The track branching left climbs towards the beginning of the traverse and continues to Navigation Point 11. The track branching right descends towards Navigation Point 10, passing to the right of the distinctive square shaped rock before continuing along the lower route.
Keeping this prominent rock on your left confirms that you are following the main Stirling Ridge Walk towards Navigation Point 10. This photograph is particularly useful because it clearly identifies the point where the decision must be made between the standard lower route and the High Traverse.
Although both routes ultimately continue towards Bluff Knoll, the High Traverse is recommended only for experienced walkers and should be undertaken only in clear weather, with good visibility and dry conditions.
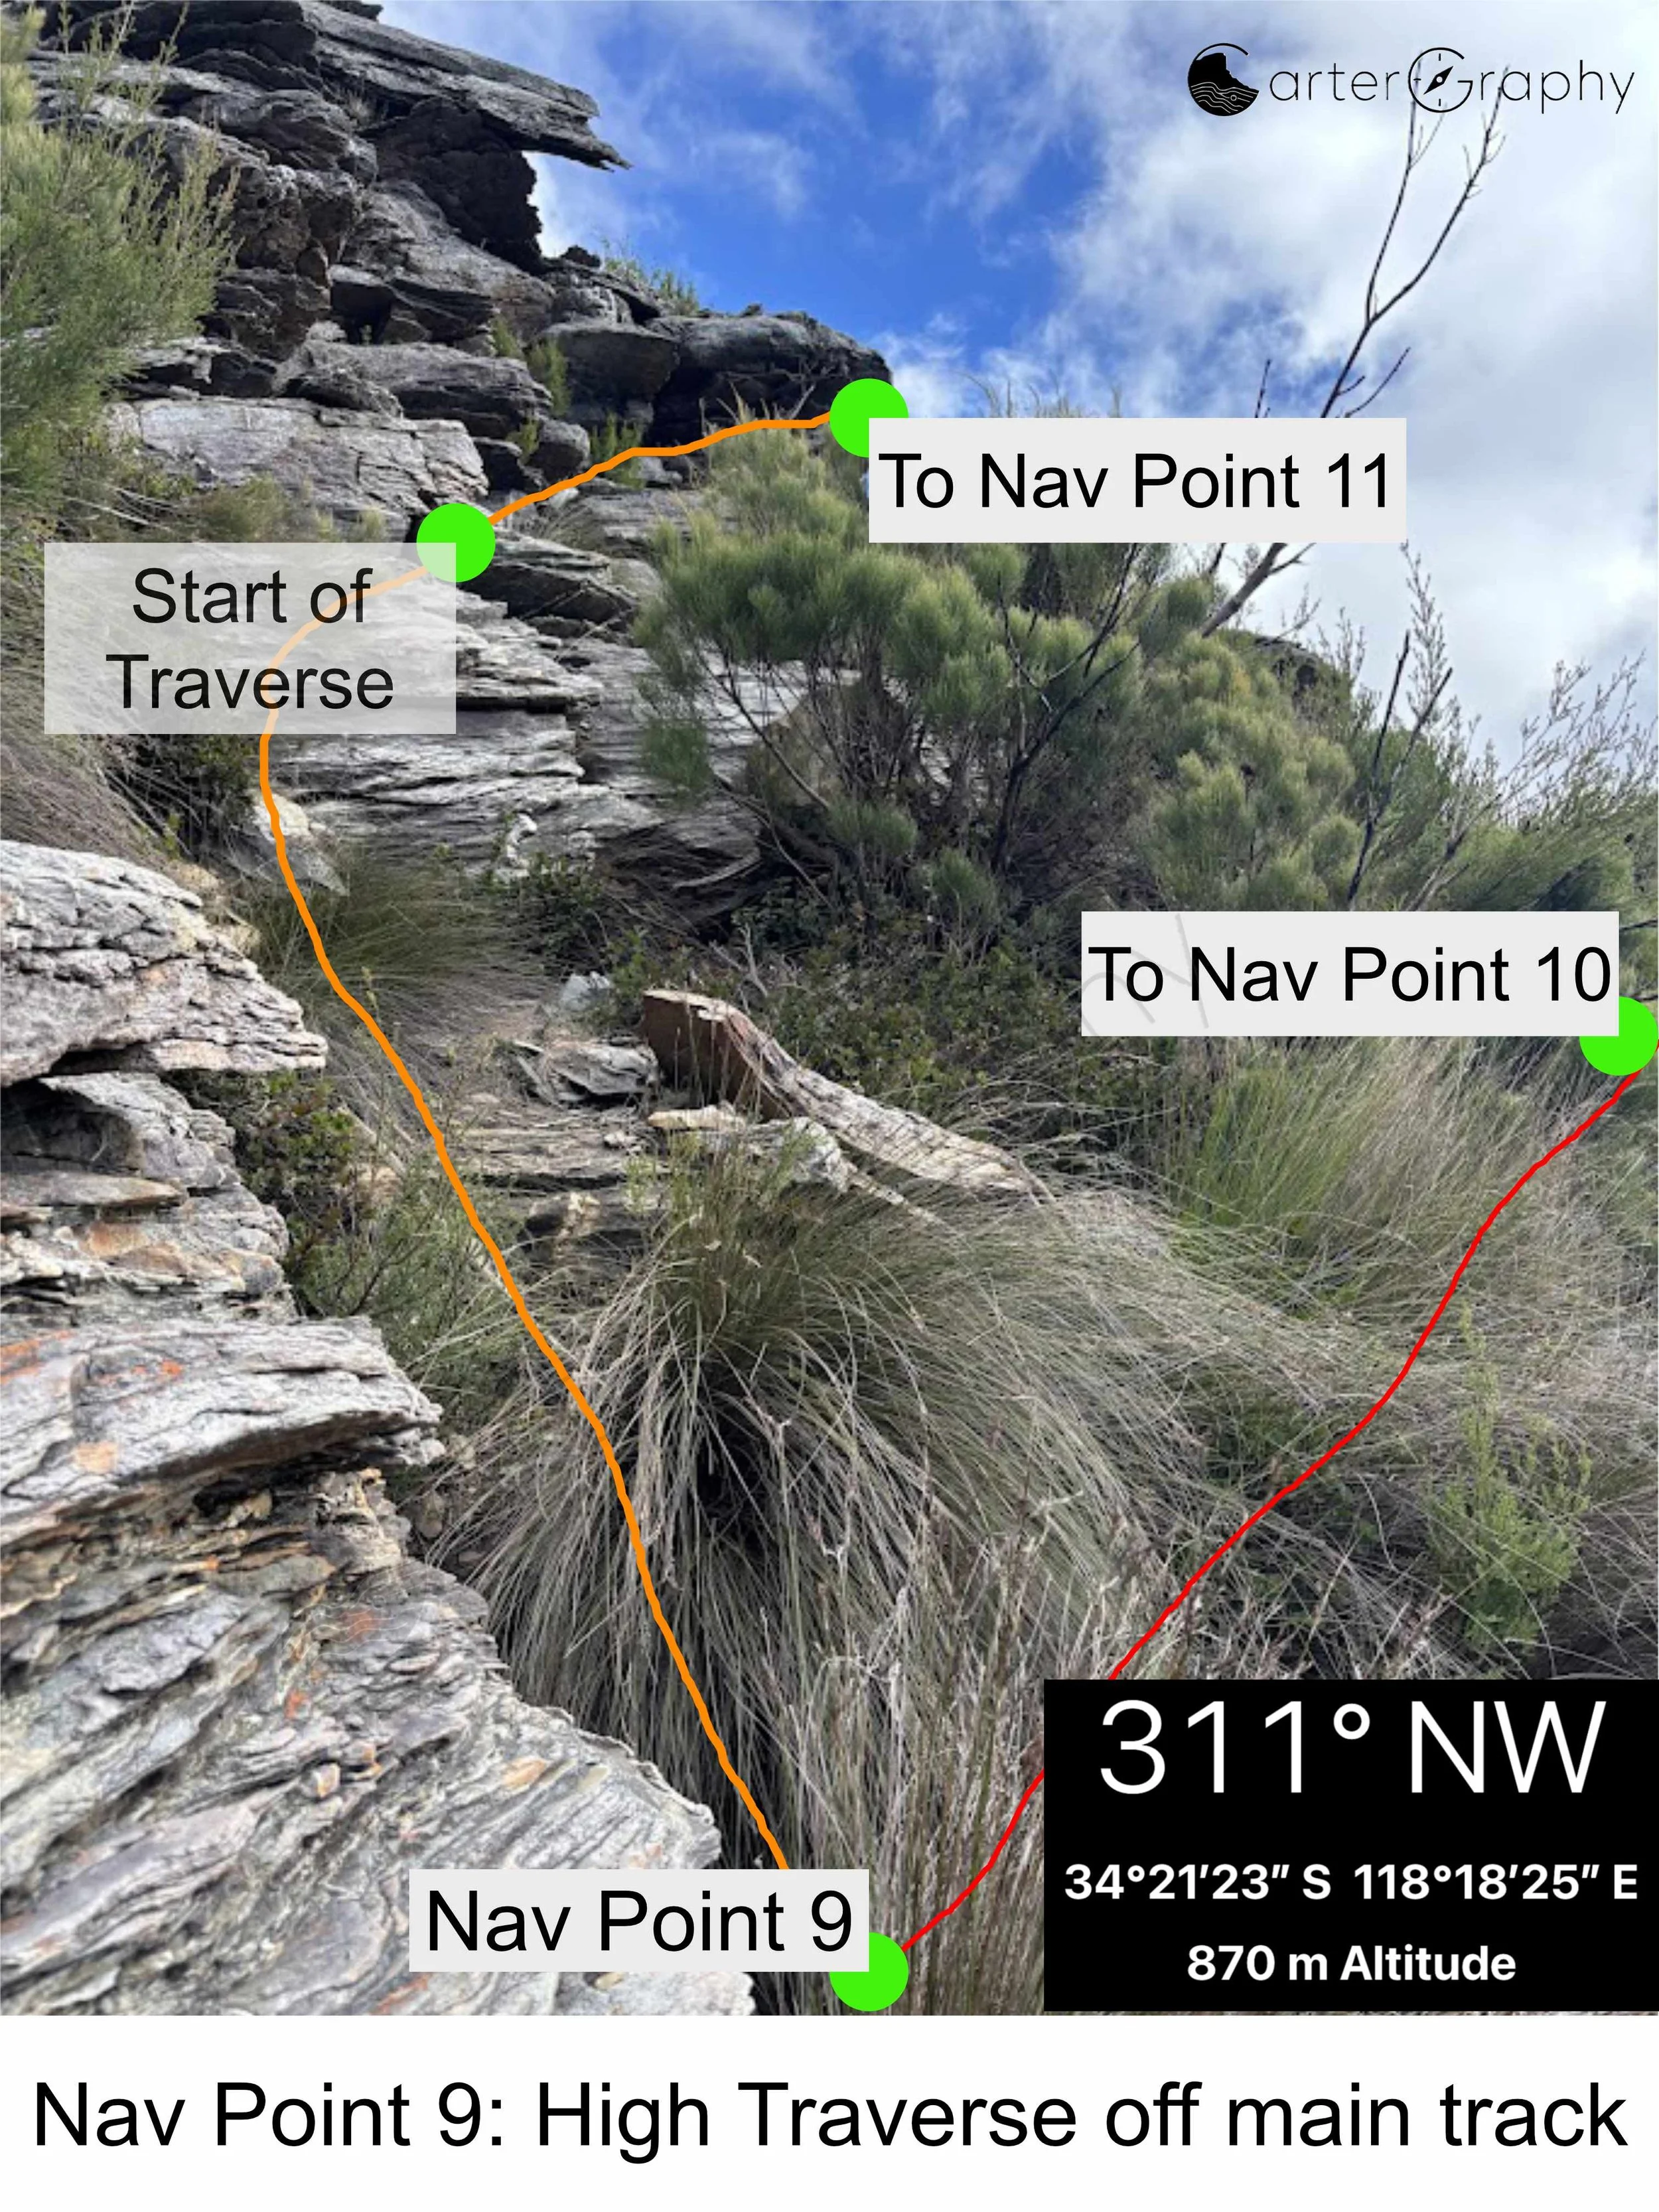
Looking north west from Navigation Point 9
Shows the junction between the main track and the High Traverse route. The High Traverse climbs immediately from this point towards the start of the traverse before continuing to Navigation Point 11.
This image provides a good indication of the terrain and the type of movement required before the exposure becomes more significant further along the traverse. The main track branches to the right and descends towards Navigation Point 10. Although both routes ultimately continue towards Bluff Knoll, the High Traverse is a significantly more demanding route and is recommended only for experienced walkers.
It should only be undertaken in clear weather, with good visibility and dry conditions. Walkers following the standard Stirling Ridge Walk should remain on the main track towards Navigation Point 10.
Looking south from Navigation Point 9
This photograph shows the steep climb leading to First Arrow. The First Arrow Cave can be clearly seen and is reached by a very short side easterly traverse from the main track.
The base of the steep climb is situated just behind the shrubs, where the main route begins its ascent towards First Arrow. This view is particularly useful because it clearly illustrates the terrain associated with the steep climb between Navigation Point 9 and First Arrow, allowing walkers travelling in either direction to better understand the route and recognise the key landmarks.
The First Arrow Cave is a distinctive landmark and provides a useful point of reference before or after negotiating the steep climb.
Looking south east towards the 1st Arrow Cave from near the base of the steep climb.
Walkers travelling towards First Arrow will notice a short side track branching left from the main route, leading to the 1st Arrow Cave beneath the large overhanging cliff.
This is a worthwhile short detour to visit the cave before returning to the main track. The principal route continues ahead to the base of the steep rock climb, which marks the next stage of the ascent towards First Arrow.
The cave is a prominent landmark and provides a useful confirmation that you are on the correct route before continuing the climb.
Video: 360° panorama filmed from Navigation Point 9
Video begins by looking back across the ridge towards Ellen Peak, Pyungoorup Peak, Third Arrow and Second Arrow, placing this section of the walk into its broader landscape context.
The camera then turns towards the First Arrow Cave, showing the short side traverse leading to the cave before panning across the steep rock climb. As the camera continues upward, it follows the route to the start of the traverse above the climb, clearly showing how the track gains the higher ground.
Finally, the video pans down to the main track, where the route passes to the right of the prominent square rock block before continuing towards Navigation Point 10. This sequence provides an excellent understanding of the relationship between the optional First Arrow Cave detour, the steep rock climb, the traverse above, and the continuation of the main route towards Navigation Point 10.
Navigation Point 9: Start of Traverse off main track. Shows 1st arrow cave and steep climb.
“Perspective is one of the greatest rewards the mountains offer”
Video: 360° panorama filmed south of Navigation Point 9
Video begins by looking back across the ridge towards Ellen Peak, Pyungoorup Peak, Third Arrow and Second Arrow, placing this section of the walk into its broader landscape context.
The camera then turns towards the First Arrow Cave, showing the eastern short side traverse leading to the 1st Arrow cave and part of the steep rock climb beyond.
Finally, the video pans down to the main track, where the route passes to the right of the prominent square rock block before continuing towards Navigation Point 10. This sequence helps walkers recognise both the optional detour to the 1st Arrow Cave and the continuation of the main route beyond Navigation Point 9.
“Perspective is one of the greatest rewards the mountains offer”
Base of Steep Climb from 1st Arrow,1st Arrow Cave and North West Pinnacle
Option 1. High Traverse of main track
This option is shown on the map as the orange alternative route that leaves the main yellow track at Navigation Point 9 and traverses across the northern flank of the North West Pinnacle before rejoining the main ridge at Navigation Point 11. Throughout this section of the map, the thicker yellow line represents the main route, while the orange line represents the high traverse alternative. When studying the map, it is important to understand that the orange traverse line is not the normal descent route. The yellow route continues through Navigation Point 10, while the orange traverse follows a more direct but significantly more exposed line.
If you choose the high traverse, leave the main track at Navigation Point 9 and cut left onto the traverse line. From the main track that leads north and descends down the North West Pinnacle, you need to turn left and ascend approximately 10 metres to pick up the traverse line heading west. It can be difficult to find the correct level. If you traverse too high, you may have trouble finding the correct exit that later swings back east toward Navigation Point 11.
Before starting the traverse, tighten every strap on your pack so it cannot swing or pull you off balance. Clip your hip belt and sternum strap. Stow your poles. Secure anything loose on the outside of the pack. On the traverse, rely on your hands and careful foot placement. Most people will be more stable with both hands free. Treat this as a short rock scramble rather than ordinary walking.
The traverse holds height and cuts west across the flank of the North West Pinnacle. It is a narrow, exposed ledge line, with the rock wall on your left and a very large drop to the north on your right. The footing can be only body width in places. For many people, this is the single most serious exposure on the entire ridge. Only take it if you are steady with height, comfortable scrambling on ledges, and stable with a full pack.
Move slowly. Keep three points of contact. If needed, move one person at a time, spot each other, and pass packs separately where that makes the movement safer. In wet, windy or stormy conditions, this traverse becomes much more serious and should be treated with extreme caution.
Before committing to this option, consider the ability of the entire party, not just the strongest or most confident person. This is not terrain where one skilled navigator or one sure footed leader can simply lead everyone through. The consequences are too high. If anyone is unsure, uncomfortable with exposure, struggling with balance, or not able to move safely on steep side hills and rock steps with a pack, choose the lower yellow route shown on the map.
I attempted to find this traverse coming from 1st Arrow summit twice and failed. On the third attempt, approaching from Sheoak Col, I ascended from the Intermediate ridge where I spotted a rope. This led me onto the correct traverse line and I exited near the 1st Arrow Cave, where I had previously been unable to identify the correct route. For this reason, I recommend making your first attempt at the traverse in the Bluff Knoll to Ellen Peak direction rather than the reverse. If it is your first attempt, do it only in ideal conditions.
As shown on the map, the traverse eventually makes a sharp right turn back east and drops down a short, steep down climb before rejoining the main ridge at Navigation Point 11, where the orange traverse route and the yellow main route merge again. This down climb is short but serious. The rock is a small cliff broken by ledges and steps. There are good handholds, but you will be facing into the rock for much of it and there is little tolerance for poor footwork. A slip here is unlikely to become a clean fall into space, but it could become a serious tumble over the ledges below.
Once you are off this steep down climb, the angle eases and you are on the Intermediate Ridge. From there, the terrain changes from short, intense scrambling into a more sustained broken descent trending north and then north east. That change in terrain is your cue that the most technical Arrow features are behind you and that you are now committed to the descent toward the base of the red bluffs and Sheoak Col.
Navigation Point 9 to Navigation Point 11: Photo Sequence
The following photographs show the high traverse route between Navigation Point 9 and Navigation Point 11 and should be viewed together with the accompanying map. On the map, the high traverse is shown as the orange route leaving the main yellow track at Navigation Point 9 before rejoining the main route at Navigation Point 11. The photographs have been arranged in the same order as the direction of travel, which is mainly westerly. Some photographs are taken looking back at the terrain covered and are useful if you are approaching the traverse towards Navigation Point 9 and 1st Arrow.
Navigation Point 10 is covered separately in Option 2: Lower Route and does not form part of the high traverse sequence shown here.
A video is also included for this section. It shows the high traverse across the northern flank of the North West Pinnacle and helps bring the map and photographs together into one cohesive overview. The map explains the route geometry, the photographs show fixed views of the key points, and the video helps show how the terrain links together as a continuous movement.
Additional photographs are included in the Navigation Point 11 section. Those images show some of the same terrain from the opposite direction and provide a useful perspective on the steep rock climb and the traverse line above it.
Used together, the map, photographs and video provide a much clearer understanding of how this section fits together. The map explains the overall route geometry and relationship between Navigation Points 9, 10 and 11. The photographs identify terrain features, landmarks and route choices encountered along the traverse. The video shows how those fixed reference points connect in real movement across the northern flank of the North West Pinnacle. Viewed as a whole, they help illustrate why the high traverse is regarded as one of the more serious route choices on the Stirling Ridge Walk.
Looking East from High Traverse
Looking back towards Navigation Point 9. Pyungoorup Peak dominates the skyline in the background, with 3rd Arrow visible in front of it. The 1st Arrow Cave is labelled beneath the cliff line, while the lower route towards Navigation Point 10 can also be seen. Together with the map, this photograph helps place the high traverse within the broader Arrow system and shows how much height has already been gained above the lower route.
Looking West from High Traverse
Looking ahead along the traverse towards Navigation Point 11. Isongerup Peak is visible in the distance beyond the cliff edge. The ledge system forming the traverse can be seen continuing ahead beneath the cliff line of the North West Pinnacle.
Looking North East from High Traverse
Looking back towards Navigation Point 9. It shows the traverse squeezed between the cliff face of the North West Pinnacle and the steep slopes below. It gives a clear indication of the exposure that characterises much of this route.
Looking West from High Traverse
This photograph shows the traverse continuing on the Northern side of the North West Pinnacle . Navigation Point 11 remains ahead and the ledge system becomes more defined.
Looking NE from High Traverse
This photograph was taken on the ascent from the Navigation Point 11 on the Intermediate Ridge. It shows the traverse towards Navigation point 9 which is just below the 1st Arrow Cave.
Looking west from High Traverse
This is one of the most important photographs in the sequence. The map shows the traverse approaching the point where it leaves the main face of the North West Pinnacle and turns sharply towards Navigation Point 11. The photograph also identifies the Intermediate Ridge below, which extends west towards Sheoak Col. Viewed together with the map, this image clearly illustrates the relationship between the High Traverse, the Intermediate Ridge, and the continuation of the main route towards Navigation Point 11.
Looking East from High Traverse
This photograph is taken near the western end of the high traverse and looks back towards Navigation Point 9. The North West Pinnacle rises directly above the route and the rock slabs beneath the cliff become more obvious as you continue on the traverse towards Navigation Point 11 on the Intermediate Ridge. This view gives a useful appreciation of the terrain already crossed.
Looking East from High Traverse
This photograph is taken close to Navigation Point 11. The Small Cave is visible beneath the cliffs of the North West Pinnacle and the route back towards Navigation Point 9 can be seen traversing the rock ledges. Navigation Point 11 lies immediately ahead and marks the point where the high traverse rejoins the main route. This cave could be used as an emergency shelter, if reaching Sheoak Col or 1st Arrow cave is not a viable option.
Video: High Traverse panorama
This panorama begins by looking back east towards Navigation Point 9 before slowly sweeping north through the surrounding landscape. Moir Hill comes into view, followed by the North Mirlpunda Track below on the plain. As the panorama continues, North Isongerup Peak and South Isongerup Peak are revealed, providing valuable landmarks for orientating yourself within the wider Stirling Ridge Walk. The camera then pans west, following the remainder of the High Traverse towards Navigation Point 11 on the Intermediate Ridge. Viewed together with the map, this panorama helps place the High Traverse in the broader landscape and reinforces the relationship between the surrounding peaks, the North Mirlpunda Track, the Intermediate Ridge, and the continuation of the main route.
High Traverse across Northern flank of North West Pinnacle