Navigation Point 14: Isongerup Main Peak (route choice)
From Navigation Point 14, the main Stirling Ridge Walk follows the yellow route shown on the map as it leaves Isongerup Main Peak and begins the descent towards Navigation Point 15 and Isongerup South Peak. This marks the transition from the highest part of the Isongerup ridge system into a more open ridgeline.
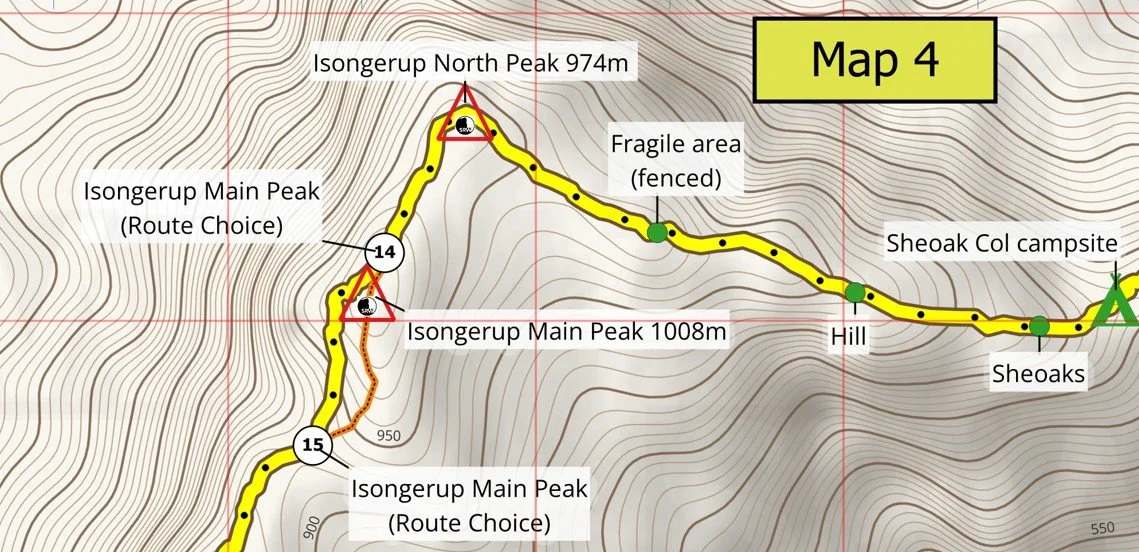
On the map below, the main route is shown as the yellow track. The optional variation to Isongerup Main Peak summit is shown as the orange track. This variation is not shown on the printed map. The same colour distinction is used in the photographs where the variation is shown as an orange line. This section is mainly about the yellow main route between Navigation Point 14 and Navigation Point 15. The orange variation to Isongerup Main Peak summit is discussed separately.
As you continue on the main yellow route, the line trends generally south west before gradually turning south south west. For much of this section the track follows close to the base of the Isongerup Main Peak crag, with the rock band remaining above and to your left. The cliffs form a prominent visual handrail, making it easier to confirm your position against the map while descending through scrub, broken ground and occasional rocky steps.
Depending on recent rainfall, this section may contain small seasonal water drips emerging from the rock above, and water commonly follows the same drainage line as the track. Any pools or seepage should be regarded as seasonal only and not relied upon as a permanent water source. After rain, this descent is often muddier and more slippery than the “Variation” over the summit of Isongerup Main Peak, because surface water naturally concentrates along this slope.
Navigation Point 15 is reached on the saddle between the Isongerup Main Peak and Isongerup South Peak. From there, the route climbs briefly onto Isongerup South Peak before the character of the walk changes again and the longer descent towards Eucalyptus Col begins.
Viewed together, the map and the three photographs provide a clear understanding of this section. The map shows the relationship between the yellow main route and the orange variation, while the photographs show the surrounding landmarks, route choices and direction of travel between Navigation Point 14 and Navigation Point 15.

The mountains have a remarkable way of turning effort into gratitude
Looking east to 1st Arrow
Looking east from Navigation Point 14, this photograph looks back towards the 1st Arrow section of the Stirling Ridge Walk.
In the background you can clearly see 1st Arrow, with 3rd Arrow, Pyungoorup Peak and Ellen Peak beyond. Sheoak Col is hidden from view in the saddle below the rounded hill.
The route climbs from Sheoak Col over this hill towards Isongerup North Peak before continuing south to Isongerup Main Peak. This photograph provides a useful overview of the route already travelled and helps place the major landmarks into their correct geographical context.
Looking NNE to descent from Isongerup Main Peak
Looking northeast from Navigation Point 14, this photograph shows the route relationship between the main Stirling Ridge Walk and the Isongerup Main Peak summit variation.
The orange line marks the optional route to the Isongerup Main Peak summit, while the main Stirling Ridge Walk continues northeast towards Isongerup South Peak. Reaching the summit itself is relatively straightforward.
However, the descent variation from the summit back to the main Stirling Ridge Walk is extremely faint and is not recommended in poor visibility or for walkers with limited navigation experience. This photograph clearly shows that the summit track is an optional variation and not part of the main Stirling Ridge Walk.
Looking SSW to Isongerup South Peak
Looking south from Navigation Point 14, this photograph shows the main Stirling Ridge Walk descending towards Navigation Point 15 before climbing to Isongerup South Peak. Navigation Point 15 marks the point where the optional summit variation to Isongerup Main Peak rejoins the main route.
The orange line shows the summit variation, while the red line shows the main Stirling Ridge Walk. This photograph clearly illustrates the relationship between the two routes and confirms that walkers returning from the Isongerup Main Peak summit rejoin the main track at Navigation Point 15 before continuing towards Isongerup South Peak.
Looking SW to Bluff Knoll
Looking southwest from Navigation Point 14, this photograph shows the relationship between the main Stirling Ridge Walk and the optional Isongerup Main Peak summit variation.
The Isongerup Main Peak summit is shown in the centre of the photograph, while Bluff Knoll can be seen in the background. The red line marks the main Stirling Ridge Walk, which descends towards Navigation Point 15 and continues to Isongerup South Peak.
The orange line marks the optional summit variation. Although reaching the summit is relatively straightforward, the descent variation back to Navigation Point 15 is extremely faint and should only be attempted by experienced walkers with good navigation skills in clear visibility.
360° Panorama Video: Navigation Point 14
This 360° panorama video was recorded from Navigation Point 14. The video begins by showing trekkers following the main route towards Navigation Point 15, with Bluff Knoll visible in the background. Eucalytus Col can be seen just above the trekkers heads, nestled in the saddle. The camera then slowly pans around to reveal the summit of Isongerup Main Peak before concluding with expansive views across the western Stirling Range. Viewed together with the map, this panorama provides valuable perspective of the route towards Navigation Point 15, the position of Isongerup Main Peak, and the surrounding landscape.
Panorama Video: Descent to Navigation Point 15 on “Variation” route
This panorama video was recorded on the descent from Isongerup Main Peak towards Navigation Point 15, located in the saddle between Isongerup Main Peak and Isongerup South Peak.
The section of route shown in this video follows an optional variation, which is illustrated in the accompanying map image on this webpage rather than on the printed map. The video begins by looking towards Isongerup South Peak before panning to reveal the track from Navigation Point 15 to Isongerup South Peak. Continuing around, Bluff Knoll comes into view in the distance, followed by the western peaks of the Stirling Range. Eucalyptus Col is nestled in the saddle south east of the Hill marked on the map with Altitude of 768m.
The panorama concludes by looking back towards the descent from Isongerup Main Peak. Viewed together with the printed map and the accompanying variation map image, this panorama provides valuable perspective of the optional route, Navigation Point 15, and the surrounding landscape.
360° panorama video from Navigation Point 14, showing the main route to Navigation Point 15, Bluff Knoll, Isongerup Main Peak, and panoramic views across the western Stirling Range.
The mountains have a remarkable way of turning effort into gratitude
Panorama video recorded on the optional variation route during the descent to Navigation Point 15, as shown in the accompanying map image, highlighting Isongerup South Peak, the route to the saddle, Bluff Knoll, the western Stirling Range, Eucalyptus Col, and the descent from Isongerup Main Peak.