
Navigation Point 2. EP summit junction (route choice)
Navigation Point 2 marks the junction between the main Stirling Ridge Walk route and the side track leading to the summit of Ellen Peak. This location is shown on the map and is illustrated in the accompanying photographs, which looks south west towards the summit of Ellen Peak.
For walkers undertaking the traverse from Bluff Knoll towards Ellen Peak, this navigation point has limited significance because it is encountered near the end of the walk. Its greatest importance is for parties travelling in the opposite direction from the Ellen Peak Trailhead towards Bluff Knoll. In that direction, it represents the point where walkers must decide whether to continue along the main traverse route or make the additional ascent to the summit of Ellen Peak and descend on the western face towards Pyungoorup.
The main Stirling Ridge Walk route bypasses the summit by traversing around the northern side of Ellen Peak before continuing towards Pyungoorup Peak. The summit track shown in the photograph climbs directly towards Ellen Peak and later rejoins the main route.
Most experienced ridge walkers who wish to visit the summit do not usually carry their full packs to the top from this junction. Instead, they continue along the northern side of Ellen Peak to Navigation Point 3, where packs can be left before making a return trip to the summit. After returning to Navigation Point 3, they then continue west towards Pyungoorup Peak and the remainder of the traverse.
This navigation point therefore serves primarily as a route confirmation marker and secondary access point to the summit of Ellen Peak. When used in conjunction with the map and photographs, it helps confirm your position and ensures that any decision to visit the summit is made deliberately rather than by accidentally following the wrong track.
Looking south west from Navigation Point 2
This photograph shows the route choice at the north west base of Ellen Peak. The left hand track climbs to the Ellen Peak summit, while the right hand track is the main Stirling Ridge Walk and traverses around the northern side of Ellen Peak.
The summit variation is shown in detail in the Map 3 inlay. Both routes rejoin at Navigation Point 3. Walkers travelling west from Ellen Peak towards Bluff Knoll who wish to visit the summit should take their full pack with them, as the summit variation rejoins the main route at Navigation Point 3 rather than returning to Navigation Point 2.
Looking south west from Navigation Point 2
This photograph shows the route choice at the north west base of Ellen Peak in poor visibility. The left hand track climbs to the Ellen Peak summit, while the right hand track is the main Stirling Ridge Walk and traverses around the northern side of Ellen Peak. The summit variation is shown in detail in the Map 3 inlay, and both routes rejoin at Navigation Point 3.
This photograph also demonstrates why it is important to understand your intended route before leaving Navigation Point 2. In cloud or whiteout conditions, the summit itself may be easy enough to reach, but route finding across the summit and the descent towards Navigation Point 3 can become much more difficult once the surrounding terrain disappears from view.
For walkers with limited navigation experience, remaining on the main Stirling Ridge Walk is generally the safer option in poor visibility. If you decide to take the summit variation when travelling west towards Bluff Knoll, remember to carry your full pack, as the variation rejoins the main route at Navigation Point 3 rather than returning to Navigation Point 2.
Navigation Point 2 in poor visibility
This photograph was taken near Navigation Point 2 in poor visibility and demonstrates how quickly conditions can change in the Stirling Range. In clear weather, surrounding peaks, ridges and landmarks provide valuable visual references that make route finding much easier. Once cloud or mist reduces visibility, those references can disappear within minutes.
This is where your map, compass and navigation skills become essential. The map allows you to understand the terrain around you even when you cannot see it, while a compass enables you to maintain the correct direction of travel between identifiable features and navigation points.
Many walkers rely heavily on visual cues to confirm they are on the correct route. When those cues are lost, uncertainty can develop quickly. A competent navigator understands the relationship between the map and the ground and can continue navigating confidently even when visibility is poor.
Always carry a map and compass and know how to use them before entering the mountains. Weather conditions can change rapidly, and clear visibility at the start of the day is no guarantee that it will remain that way.
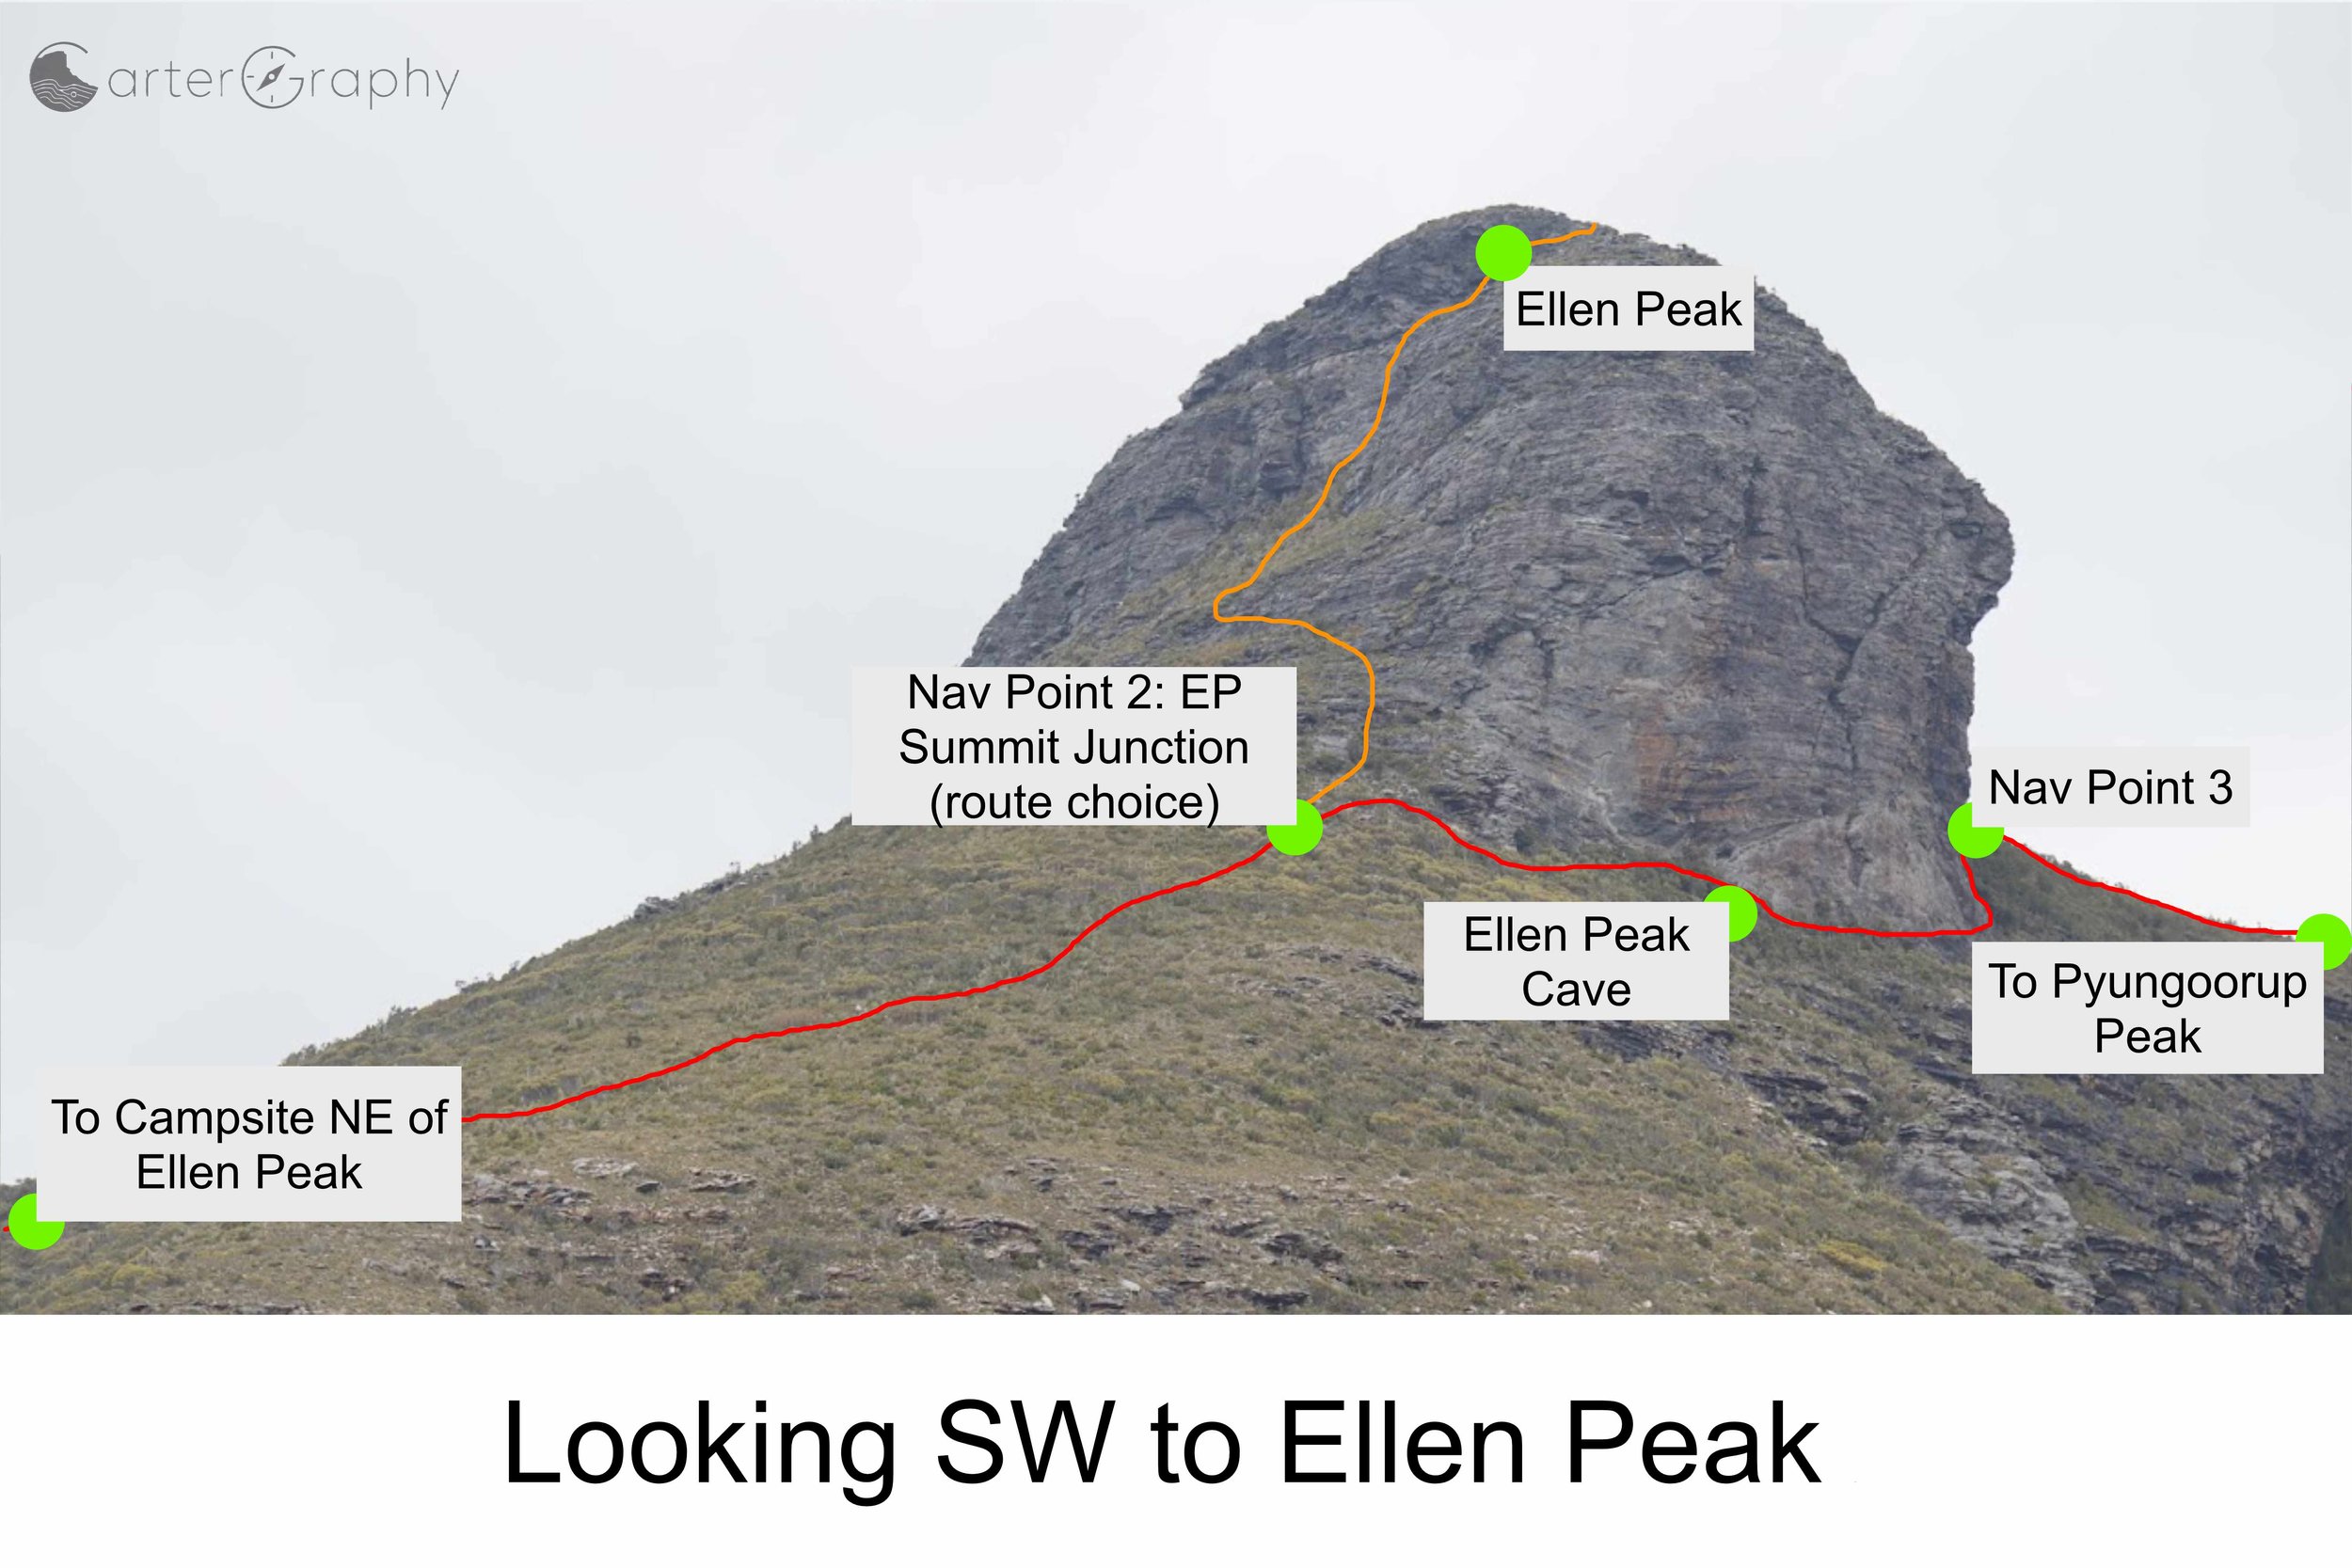
Looking south west towards Ellen Peak
This photograph shows the route options between Navigation Points 2 and 3.
From Navigation Point 2, the main Stirling Ridge Walk traverses around the northern side of Ellen Peak, passes Ellen Peak Cave and continues to Navigation Point 3. The orange line shows the alternative route over the Ellen Peak summit.
Walkers travelling west who wish to visit the summit can take the summit route from Navigation Point 2 and continue across Ellen Peak to Navigation Point 3 with their packs. Alternatively, they can remain on the main route to Navigation Point 3, leave their packs there, make a return trip to the summit, and then continue west towards Pyungoorup Peak.
Video: 360° panorama from Navigation Point 2
This 360° panorama is taken from Navigation Point 2, where you choose between continuing on the main track around the northern side of Ellen Peak or taking the optional variation to Ellen Peak Summit. Together with the map, it provides an excellent overview of this important route choice.
On the map, the main track is shown in yellow and traverses around the northern side of Ellen Peak. The optional variation is shown in orange and climbs to Ellen Peak Summit before rejoining the main track at Navigation Point 3.
The panorama begins by looking towards trekkers continuing along the main track around the northern side of Ellen Peak. The low cloud and poor visibility demonstrate how quickly weather conditions can reduce your ability to identify landmarks and emphasise the importance of careful navigation.
As the camera pans to the north-east, it reveals the track approaching from the Ellen Peak campsite. Continuing around, the panorama shows the track climbing towards Ellen Peak Summit, clearly illustrating the Y-shaped junction where the summit variation leaves the main track.
Viewed together with the map, this panorama helps you understand the relationship between the main track, the Ellen Peak Summit variation, and the track approaching from the north-east at Ellen Peak campsite. It also demonstrates how reduced visibility can make route finding more challenging, reinforcing the importance of using your map and recognising this key navigation point before continuing your journey.