Navigation Point 15: Isongerup Main Peak (route choice)
This section describes the summit variation from Navigation Point 15 to the summit of Isongerup Main Peak. It is primarily intended for walkers approaching from Eucalyptus Col and travelling east towards Isongerup Main Peak.
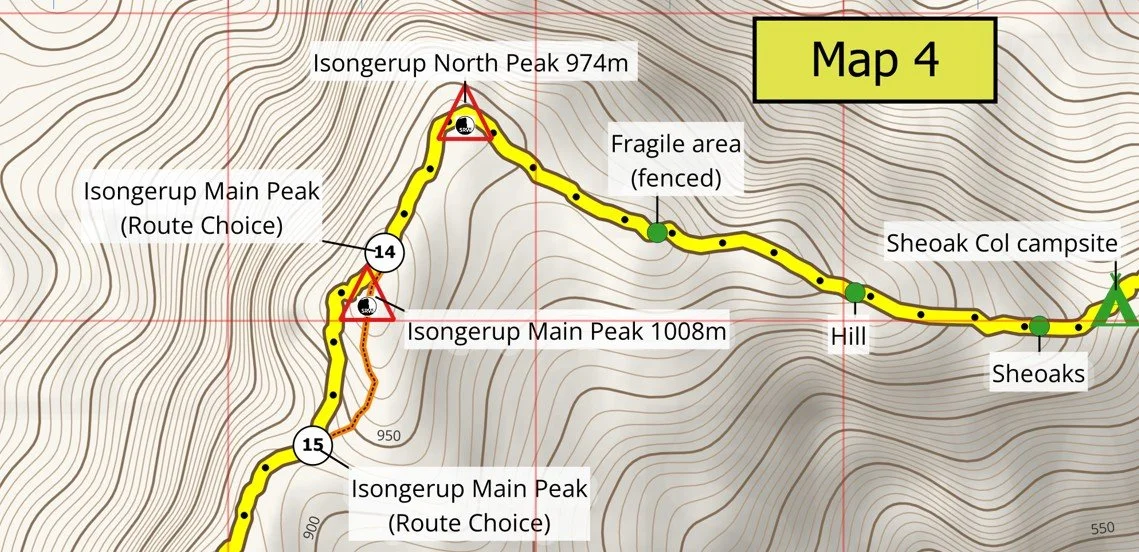
Navigation Point 15 is located in the saddle between Isongerup South Peak and Isongerup Main Peak. From here you decide whether to remain on the main Stirling Ridge Walk or take the optional summit variation.
On the map image below, the main Stirling Ridge Walk is shown as the yellow line. The optional summit variation is shown as the orange line. This orange variation is not included on the printed map. The same colour scheme is used throughout the photographs, where the variation is shown in orange and the main route in red, making it easier to compare the two options.
As you approach Navigation Point 15 from Isongerup South Peak, the relationship between the two routes becomes increasingly obvious. The main route traverses below the summit, while the summit variation climbs directly towards Isongerup Main Peak. However, once standing at Navigation Point 15, the junction itself can be less obvious on the ground, so use the map and photographs together to confirm your route.
The summit variation is steeper than the main route but is generally straightforward in good visibility. Open rock slabs and low heath provide a reasonably clear line to the summit plateau. From there, the route crosses Isongerup Main Peak in a general south to north direction before rejoining the main Stirling Ridge Walk at Navigation Point 14.
Although the ascent is relatively easy to follow in clear weather, the summit plateau and descent variation become much more difficult to navigate in cloud, mist, rain or poor light. Visual reference points quickly disappear, making it easier to lose the faint track. For this reason, the summit variation is recommended only in good visibility and for walkers with confident navigation skills. In poor visibility, the safer option is to remain on the main Stirling Ridge Walk.

“When you reach the end, take a moment to appreciate how far you've come”
When you reach the end, take a moment to appreciate how far you've come
Looking NE to Isongerup Main Peak
Looking northeast towards Isongerup Main Peak, this panoramic photograph was taken on the easterly approach from Eucalyptus Col. It shows the relationship between the main Stirling Ridge Walk and the optional Isongerup Main Peak summit variation.
Navigation Point 15 is located in the saddle immediately before the ascent to Isongerup Main Peak and marks the decision point. Walkers intending to visit the summit leave the main route here and follow the orange summit variation, while those continuing along the Stirling Ridge Walk remain on the main route towards Sheoak Col.
Looking SW to Bluff Knoll
Looking southwest from the descent of Isongerup Main Peak, this panoramic photograph shows the relationship between Navigation Point 15, Isongerup South Peak, Eucalyptus Col and Bluff Knoll. The main Stirling Ridge Walk descends from Isongerup Main Peak to Navigation Point 15 before climbing steadily towards Isongerup South Peak. From this elevated viewpoint, it is easy to appreciate the position of Eucalyptus Col relative to Isongerup South Peak and the route ahead towards Bluff Knoll. The photograph also shows where the Isongerup Main Peak summit variation rejoins the main Stirling Ridge Walk at Navigation Point 15.
Looking northeast from Navigation Point 15
This photograph shows the Isongerup Main Peak summit variation. From Navigation Point 15, walkers intending to visit the summit leave the main Stirling Ridge Walk and follow the Isongerup Main Peak summit variation, which climbs in a northeasterly to north northeasterly direction towards the summit.
Walkers remaining on the Stirling Ridge Walk continue on the main route towards Sheoak Col. The ascent to the summit is straightforward. However, the descent from the summit back to Navigation Point 15 is extremely faint and is not recommended in poor visibility or for walkers with limited navigation experience.
360° Panorama Video: Navigation Point 15
This 360° panorama video was recorded from Navigation Point 15, located on the saddle between Isongerup Main Peak and Isongerup South Peak. The video begins by looking up towards the summit of Isongerup Main Peak before slowly panning across to Isongerup South Peak. Trekkers can then be seen leaving Navigation Point 15 and following the main route towards Isongerup South Peak. The panorama concludes by returning towards Isongerup Main Peak. Although the route descending from the summit is largely hidden from this viewpoint, it can be seen in the accompanying photograph looking towards Isongerup Main Peak from the north east, where the track traverses diagonally across the lower slopes of the mountain before reaching Navigation Point 14. From there, the main route continues a short distance to Navigation Point 15 on the saddle. Viewed together with the map and accompanying photographs, this panorama provides valuable perspective of Navigation Point 15, the saddle between the two peaks, and the continuation of the main route in both directions.
Taken from Navigation Point 15: Isongerup Main Peak (route choice) showing Isongerup South Peak and Isongerup Main Peak.