Section 9. Back bearings
What is a Back bearing?
A back bearing is simply the bearing in the opposite direction to your original bearing. It follows exactly the same line, but points in the reverse direction.
Back bearings have several useful applications in navigation. In the field, they can be used to look back towards your departure point and check that you are still travelling along your intended line. They are also useful when transferring field observations onto a map, particularly when carrying out a resection.
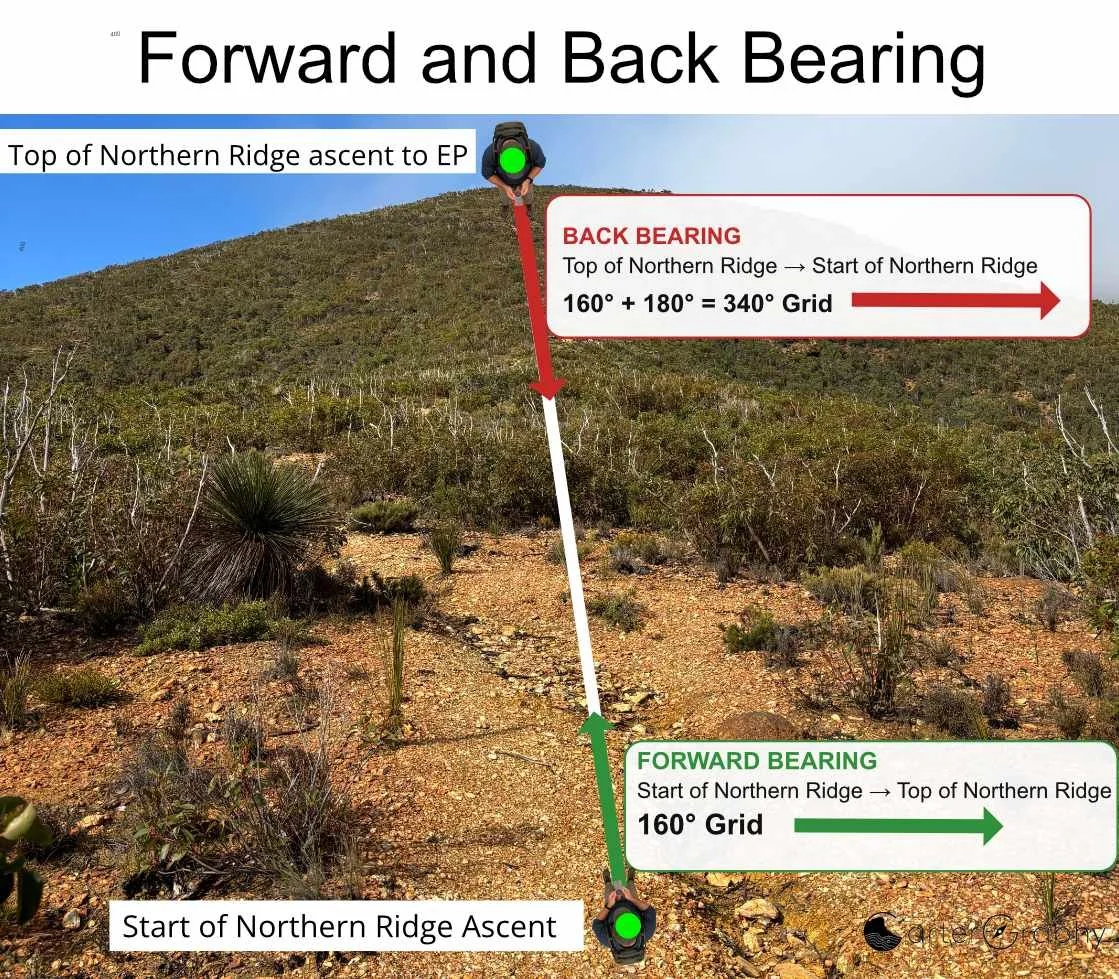
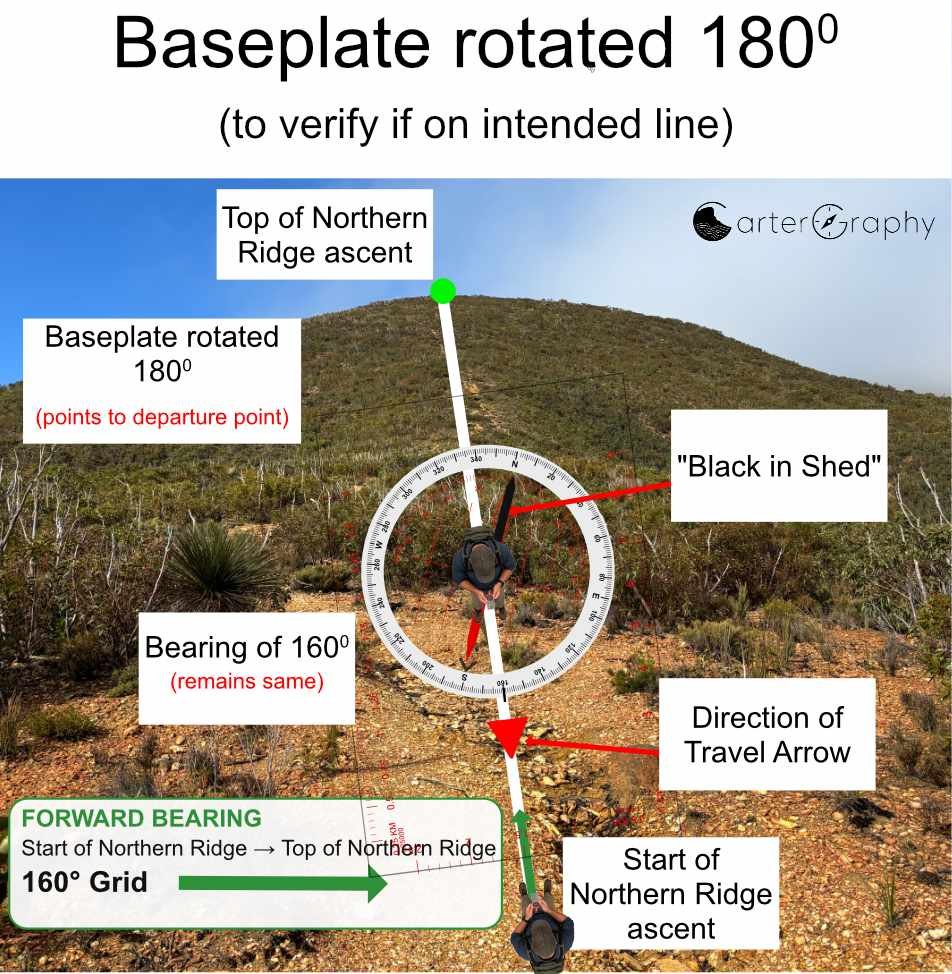
The diagram and photo below provides an example. The forward bearing from the start of the Northern Ridge ascent to the top of the Northern Ridge is 160° Grid. The back bearing follows the same line in the opposite direction, from the top of the Northern Ridge back towards the start of the ascent.
Because 160° is less than 180°, add 180°:
160° + 180° = 340° Grid
The forward bearing is therefore 160° Grid and its back bearing is 340° Grid. The two bearings always differ by exactly 180°.
The rule is straightforward:
Bearing less than 180° → add 180°
Bearing 180° or greater → subtract 180°
This same principle can be used when plotting a field bearing back from a known feature during resection. For example, a bearing taken from Ellen Peak towards Pyungoorup Peak can be reversed to obtain the back bearing from Pyungoorup Peak towards your position on Ellen Peak.
Forward Bearing
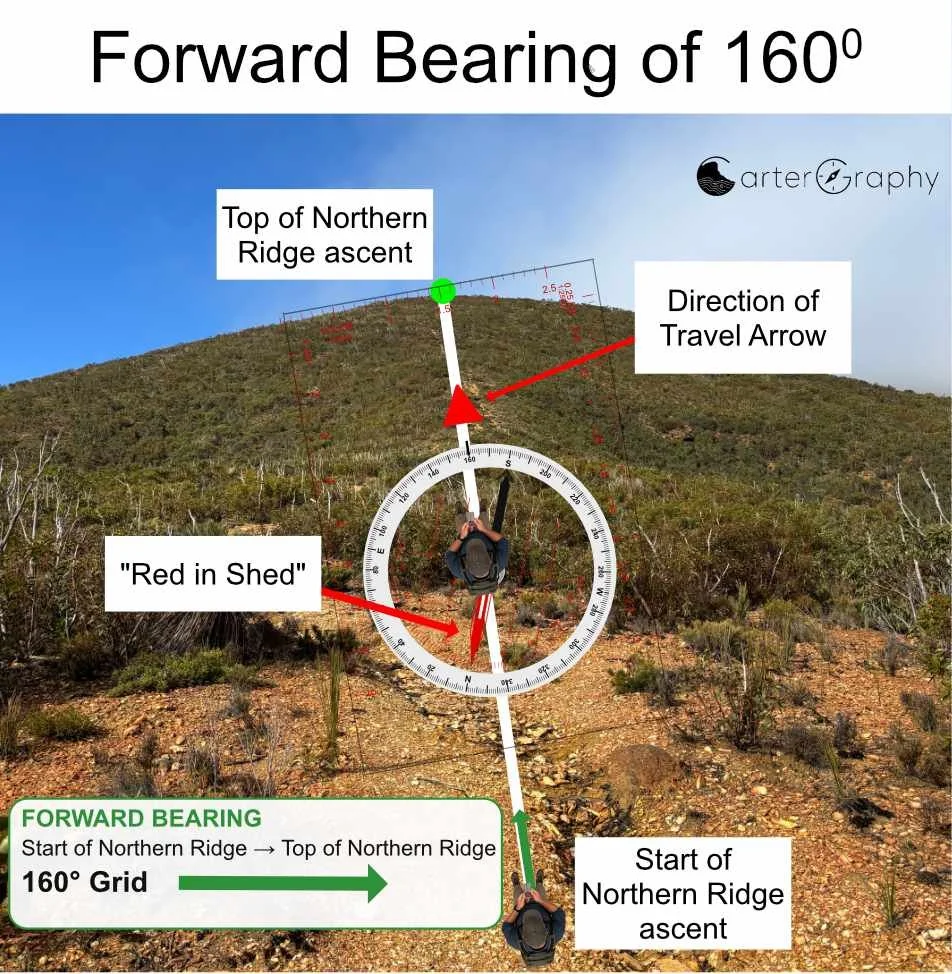
This example shows the traditional use of the compass to follow a bearing in the field.
From the start of the Northern Ridge ascent, the intended destination is the top of the Northern Ridge ascent, on a bearing of 160° Grid.
Set 160° at the compass bearing index, then hold the compass level in front of you. Rotate your body, rather than the bezel, until the red end of the magnetic needle is correctly aligned with the orienting arrow, “Red in the Shed.”
Once the needle is aligned, the Direction of Travel arrow indicates the direction you need to travel. Look ahead along this line and, where possible, select a recognisable point in that direction to walk towards.
In this example, the Direction of Travel arrow points directly towards the top of the Northern Ridge ascent, demonstrating the forward bearing of 160°.
Key point: Once the bearing has been set, keep the bezel fixed. You establish your direction of travel by turning yourself and the entire compass until Red is in the Shed.
When should you use a Back bearing?
A back bearing is most useful when following a compass bearing across open terrain where there are few obvious landmarks or tracks to guide you.
After walking a short distance, stop while your departure point is still visible. A quick back bearing allows you to confirm that you are still following your intended line of travel before continuing.
Once your departure point is no longer visible, this particular check is no longer possible and you must rely on your map, compass and surrounding terrain.
Checking your line using the same bearing
There is no need to calculate or set a new bearing for this check. The compass remains set at the original forward bearing of 160°.
After travelling some distance, stop while your departure point is still visible. Turn around to face the departure point and rotate the entire baseplate 180°, so that the Direction of Travel arrow points directly back towards where you started. Do not rotate the bezel; the bearing remains set at 160°.
Because the compass is now pointing in the opposite direction, you are no longer looking for Red in the Shed. Instead, the black or white, south pointing end of the magnetic needle should sit inside the orienting arrow, “Black in the Shed.”
For this check, the displayed 160° bearing is effectively ignored. What matters is the relationship between the departure point, the Direction of Travel arrow and the magnetic needle.
If the Direction of Travel arrow points directly at your departure point and Black is in the Shed, you are still on the intended line of travel.
If the Direction of Travel arrow points at your departure point but Black is not in the Shed, you have moved to one side of your intended line.
Key point: Keep the original bearing set. Turn around, point the compass back at your departure point, and check for Black in the Shed.
Correcting back to your intended line of travel
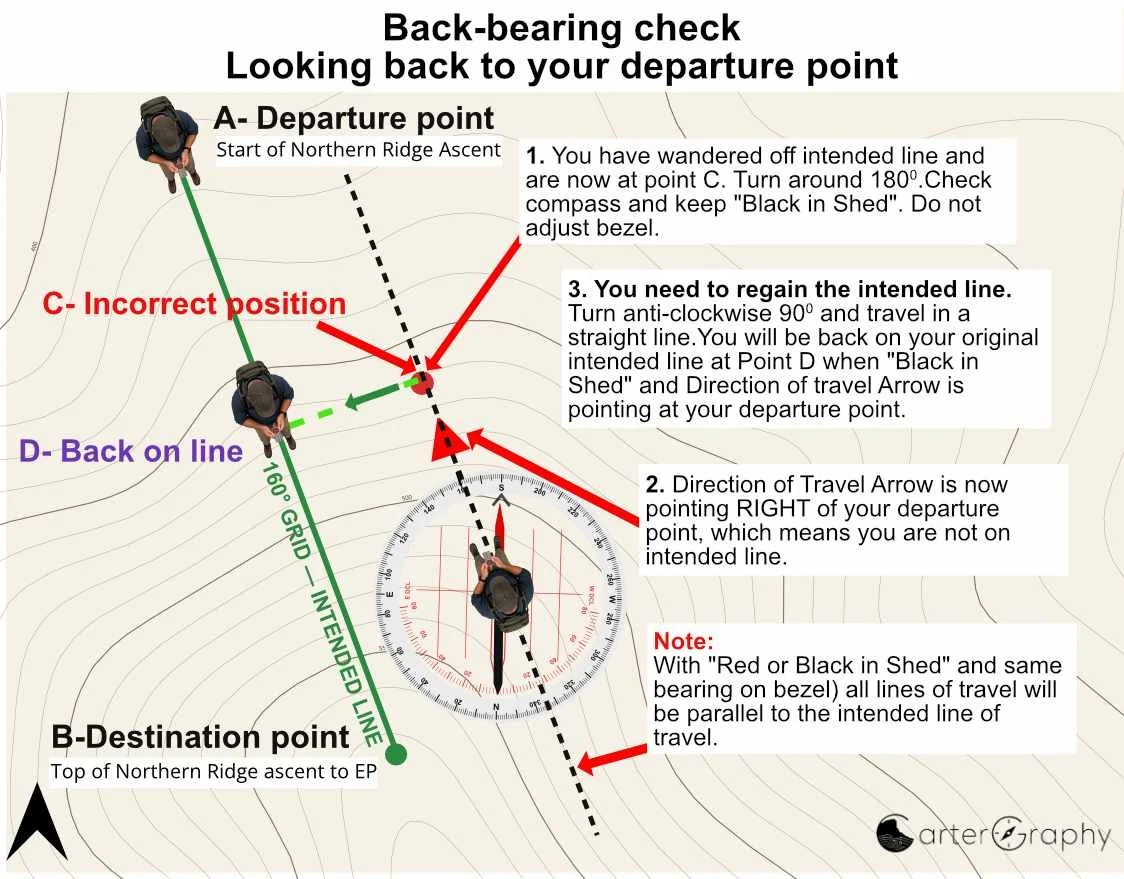
This image demonstrates what happens when you have moved sideways from your original line of travel.
At point C: Incorrect position, the compass is still set to the original 160° bearing and the bezel has not been changed. Looking back towards the A: Departure point, align Black in the Shed. This keeps the Direction of Travel arrow parallel to the original line of travel.
In this example, the Direction of Travel arrow points to the right of A: Departure point, showing that you are no longer on the intended line between A and B.
To correct your position, turn 90° anti-clockwise and travel at right angles (perpendicular) to the intended line of travel. This provides the shortest route back to your original line. Continue until, when looking back towards A with Black in the Shed, the Direction of Travel arrow points directly at A.
At point D, the Direction of Travel arrow once again points directly at A. You have regained the original line of travel. Turn around and continue towards B on the original 160° bearing.
Key point: If you discover that you have drifted off the intended line of travel, simply continuing on the original 160° bearing from your incorrect position will not return you to it. You will continue along a parallel line. You must first correct sideways to regain the original intended line, then continue towards your destination at point B.
In practice, a perpendicular correction provides the shortest distance back to the intended line, but terrain should always take priority. If steep ground, cliffs, dense vegetation or other hazards make a direct 90° correction unsafe or impractical, choose a safer route back to the intended line.
Calculating and using the reciprocal bearing (Back bearing)
Some navigators prefer to use the familiar Red in the Shed technique when looking back towards their departure point. To do this, the bezel must first be changed from the original forward bearing to its reciprocal, or back bearing.
To calculate the reciprocal bearing:
If the original bearing is less than 180°, add 180°.
If the original bearing is 180° or greater, subtract 180°.
Examples
45° becomes 225°
97° becomes 277°
160° becomes 340°
225° becomes 45°
277° becomes 97°
340° becomes 160°
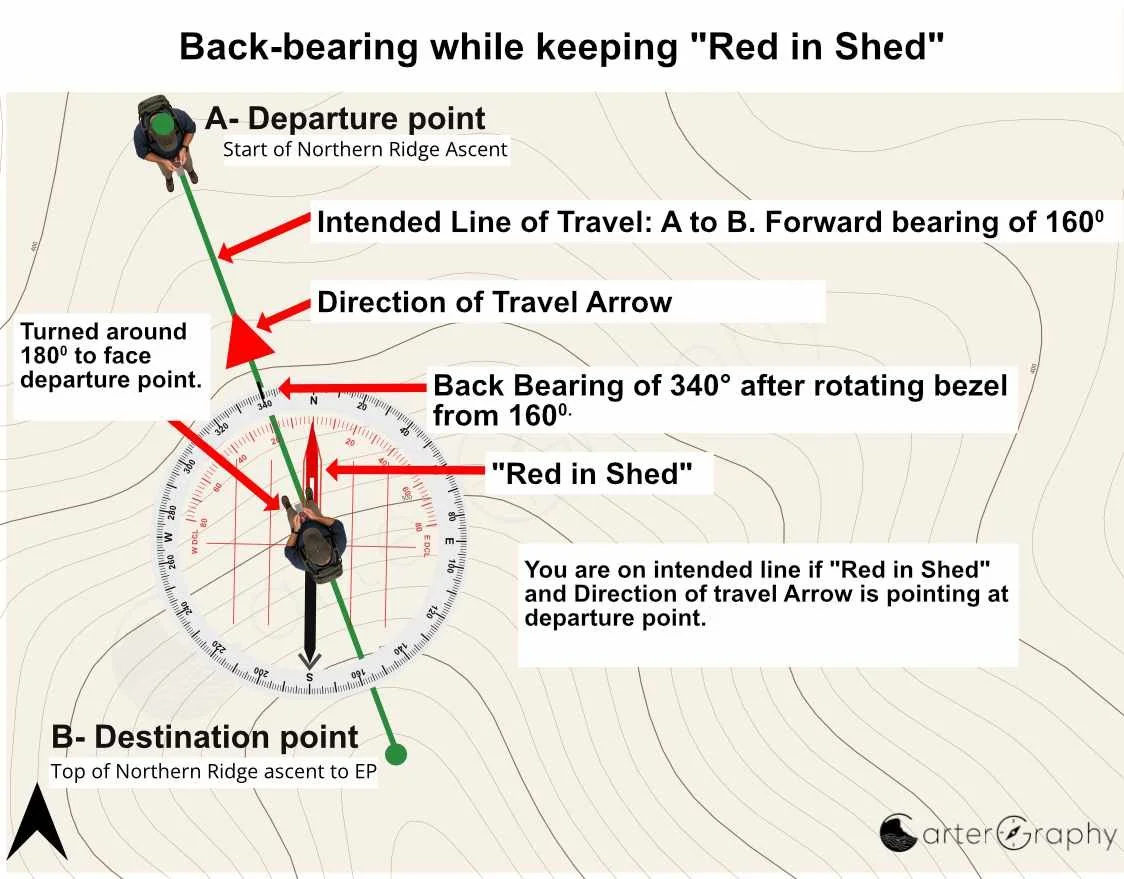
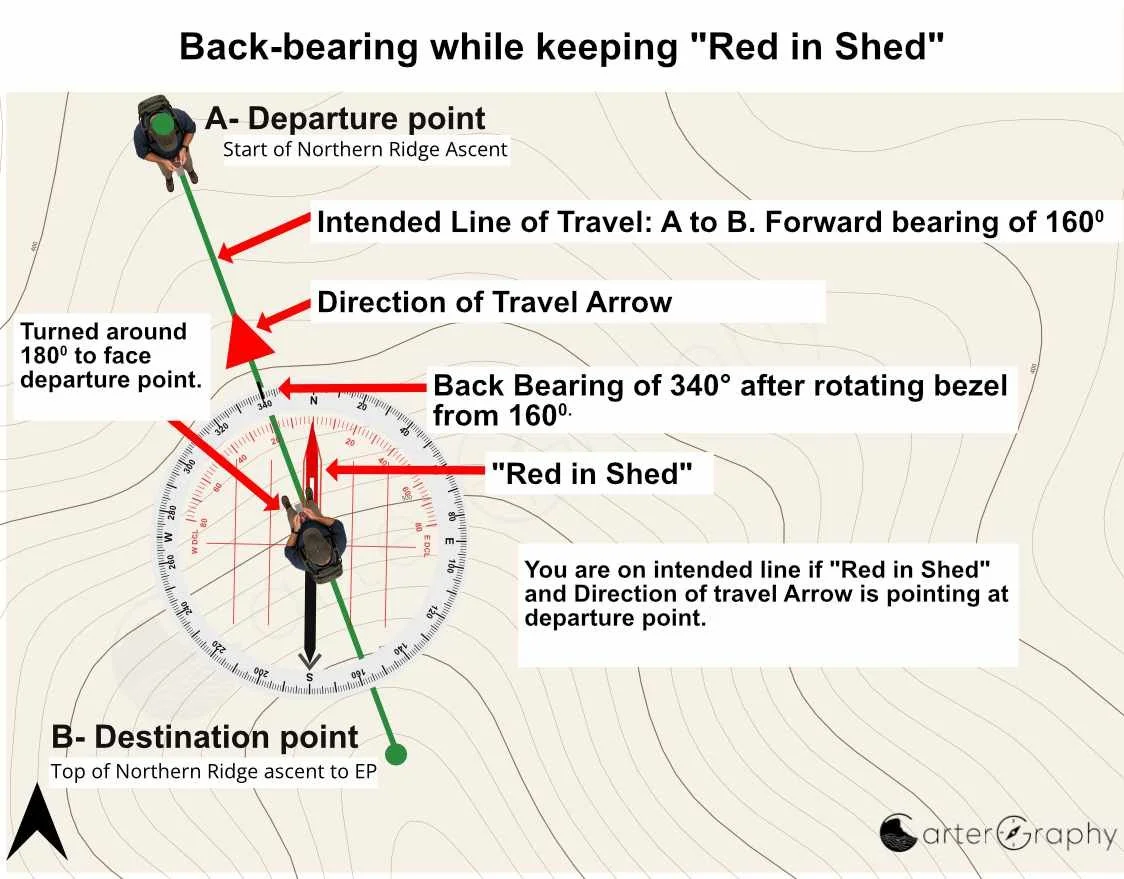
In the example shown, the forward bearing from A to B is 160°. The reciprocal bearing from B back towards A is therefore 340°:
160° + 180° = 340°
You should not end up with a negative number or a number above 360.
Once the reciprocal bearing has been calculated:
Rotate the compass housing from the original 160° bearing to the reciprocal bearing of 340°.
Turn around and face your departure point at A.
Hold the compass in the normal forward position, with the Direction of Travel arrow pointing towards A.
Rotate your body until the red, north pointing end of the magnetic needle sits inside the orienting arrow, Red in the Shed.
If the Direction of Travel arrow points directly at A while Red is in the Shed, you are still on your intended line of travel.
If the Direction of Travel arrow does not point directly at A, you have drifted to one side of the intended line and can use the same principle shown in the previous example to regain it.
Before continuing towards B, rotate the bezel back from 340° to the original 160° bearing and turn around to face your destination.
Key point: This method is different from the previous Black in the Shed technique. With Black in the Shed, the bezel remains set to the original 160° bearing. With this method, you deliberately change the bezel to the reciprocal 340° bearing, allowing you to use the familiar Red in the Shed technique while looking back towards A.